26 years after its initial release, Netcat still remains one of the most valuable tools in the toolbox of any network engineer, penetration tester, system admin, or any other IT professional for that matter. Yes, even today Netcat is still the swiss army knife of TCP/IP. Even more so is Nmap's updated re-implementation "Ncat."
One of Ncat’s most useful, and perhaps all too often overlooked, features is its ability to be statically compiled to run natively on Windows without the need for a special runtime environment. In fact, there is an entire page of the Nmap project's wiki with detailed and up-to-date instructions for compiling a portable version of an Ncat release...or at least there is now.
Old Binaries, Old Problems
Not too long ago I was working on curating a set of useful tools and more "polished" scripts for myself and my coworkers to use in some of our common tasks. Naturally, Ncat was at the top of my list of tools to add to this set. Many of us kept Nmap installed on our workstations, which on Windows also installs Ncat, but that wouldn't do us much good in situations where we needed to connect to a remote host to investigate an issue. In those cases, some would resort to using the tried-and-true Telnet client. I wasn't particularly fond of that approach as the Telnet client is disabled by default in Windows 10 and the capabilities are very basic.
I was thrilled when I found that the Nmap project's wiki already includes a link to download a statically compiled Windows binary version of Ncat. Unfortunately, it turned out that the version available for download, version 5.59BETA1, was from a much older beta release of Nmap, with version 7.92 being the latest stable release at the time of this writing. Hopeful that I could still make it work, I went ahead and downloaded the binaries provided by the Nmap project...or more accurately I attempted to download the binaries.
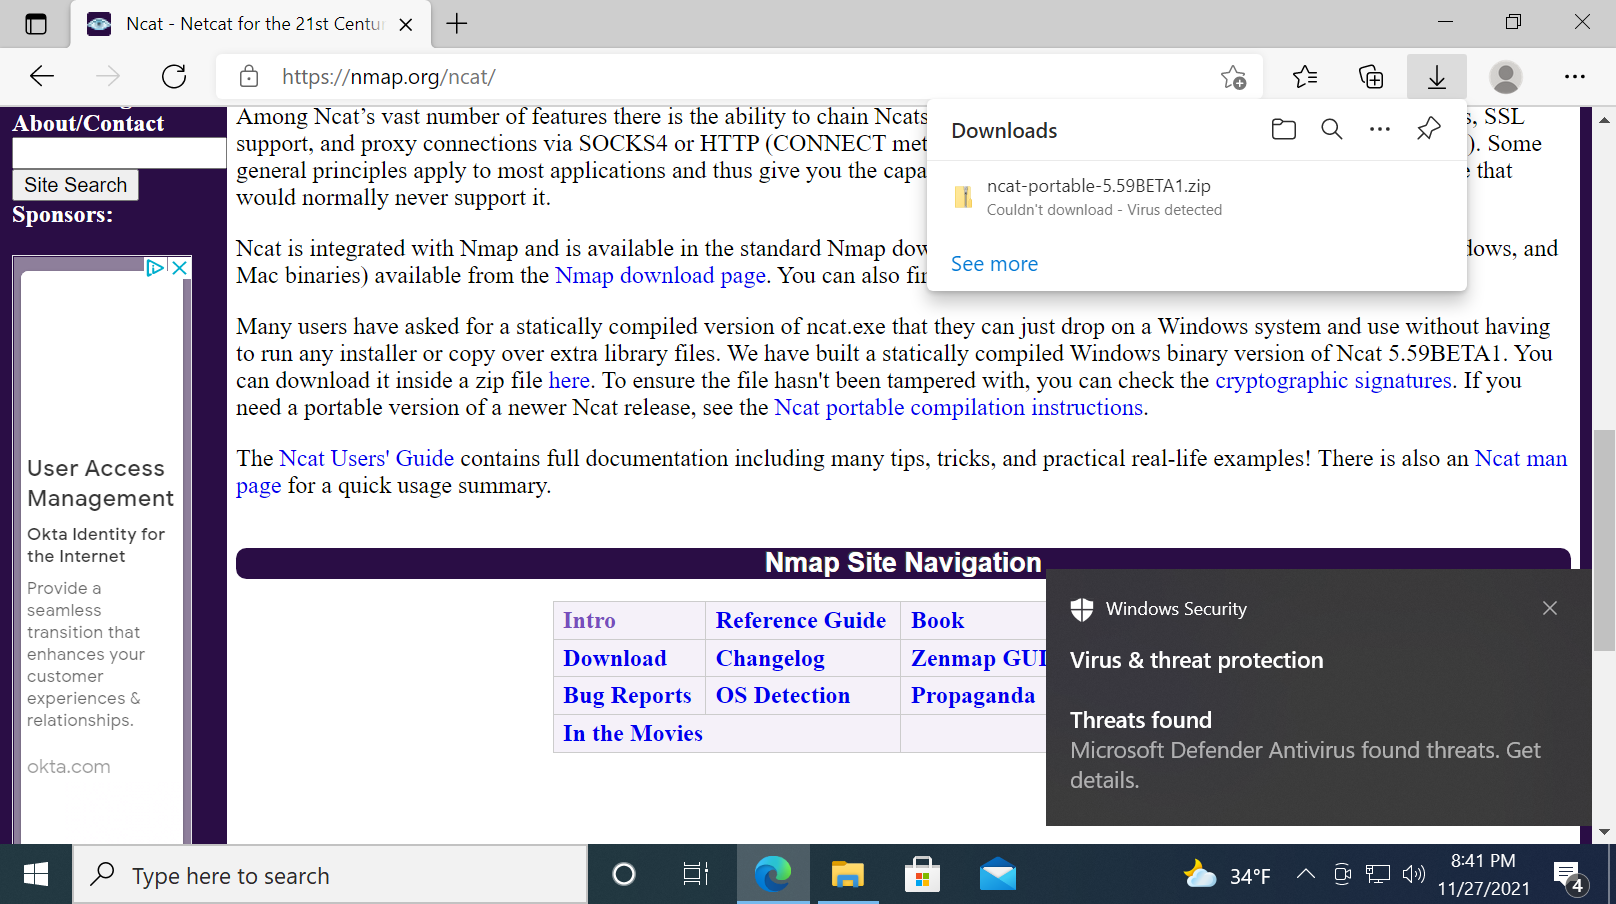 Ncat portable flagged as malicious by Microsoft Defender
The first problem I ran into was that Microsoft Defender flags the download as malicious. This isn't exactly the fault of the Nmap project as Ncat is not inherently malicious software. That being said, Ncat is a powerful tool with a vast range of capabilities and can be used for things like creating reverse and bind shells, bypassing firewalls, and tunneling traffic fairly trivially. Given its potential malicious use cases and the fact that this particular binary has been around for quite some time, it's unsurprising the file hash has been added to the databases of a number of security vendors.
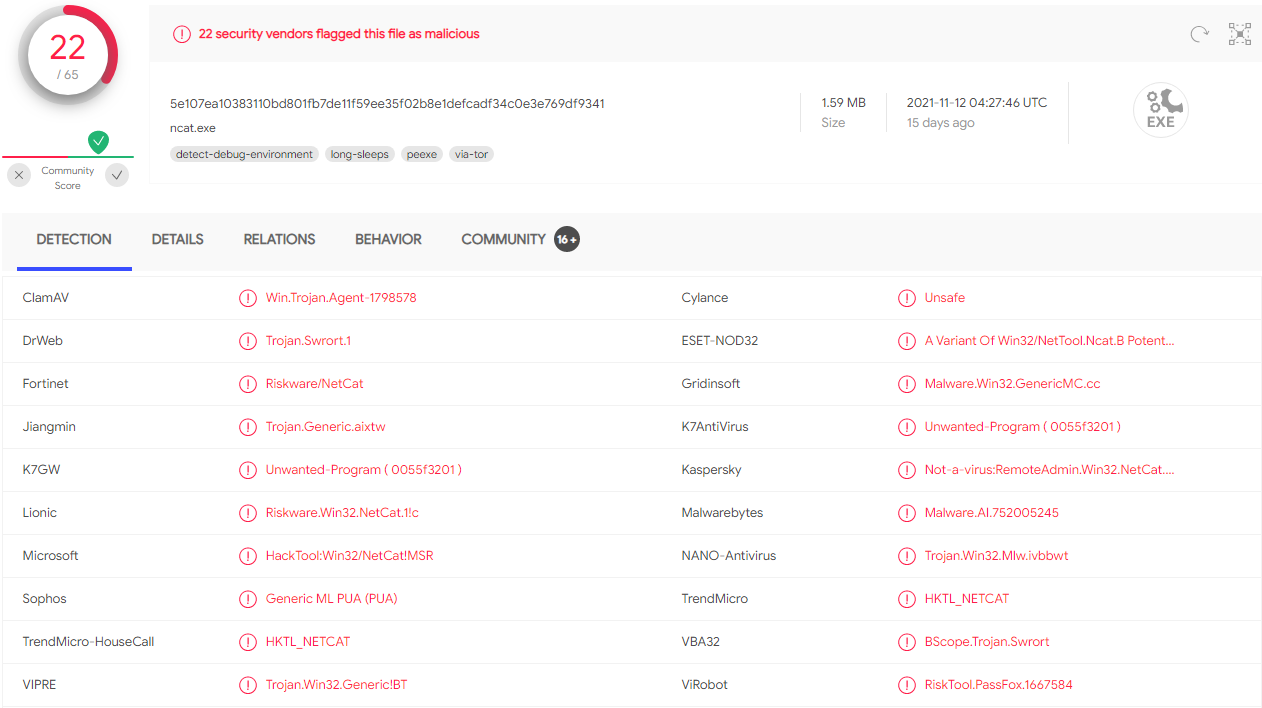 Ncat portable VirusTotal detection rate
This was a major roadblock given that if Microsoft Defender flags the file as malicious, it would be more than likely our enterprise endpoint detection and response (EDR) solution would do the same. Nevertheless, I allowed the file to bypass Microsoft Defender and moved forward to test the old binary to verify that it wasn't missing any of the features of newer Ncat releases. This is when I ran into my second issue.
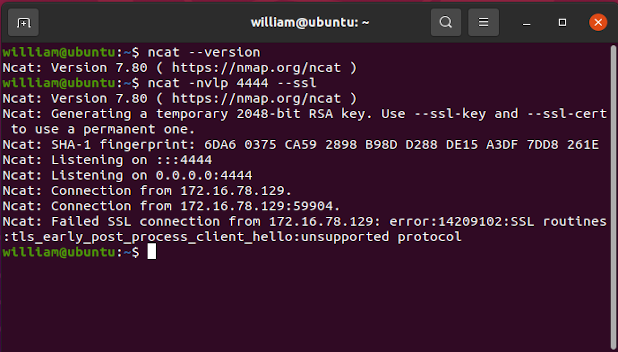
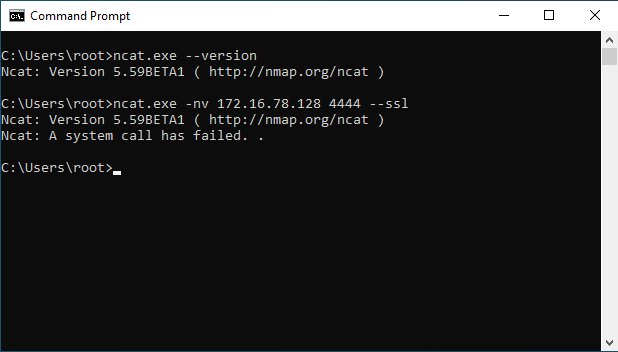
Newer versions of Nmap and Ncat are compiled against newer versions of OpenSSL than the old Ncat portable 5.59BETA1 binary, which was compiled against OpenSSL version 1.0.0d. As a result, when trying to establish a secure client-server connection between a host running a recent version of Ncat (in this case an Ubuntu host with Ncat version 7.80 installed) and a Windows host using the old Ncat portable 5.59BETA1 binary, the connection fails. The version of OpenSSL that the old Ncat portable binary was statically compiled against does not implement the protocols used by newer versions of OpenSSL and, by extension, newer versions of Ncat. For me, this was a deal-breaker for the old binary.
A Solution to the Problem
At that point, I knew my only option if I wanted to solve the problems I was facing with the Ncat portable 5.59BETA1 binary was to compile a portable version of a newer Ncat release, statically linked against a newer version of OpenSSL. Unfortunately, at that time, the Ncat portable compilation instructions on the Nmap project's wiki were woefully outdated. It seemed that demand for a portable version of Ncat for Windows had fallen off and no one had been able to get the newer versions of Ncat compiled and properly statically linked to resolve the necessary dependencies to produce a portable executable. Either that or anyone who had managed to do so lacked the interest to share their working instructions with the world. Regardless, I wasn't about to let that stop me from getting the portable binary I needed...eventually.
It actually ending up taking me about a year to find the time and to do the research necessary to get everything working. One issue was that I don't actually use Windows on any of my personal computers, which meant getting a Windows VM setup to do the work in. Another was that the Ncat portable compilation instructions on the Nmap project's website didn't really include any information relevant to resolving the issues that I was running into. At one point, I even emailed Gordon Lyon (Fyodor), the creator of Nmap, to ask if he knew anything about the current state of Ncat portable and if it was even possible to compile a portable version of newer Ncat releases. He responded fairly quickly and very politely encouraged me to check with the Nmap dev mailing list to see if perhaps someone there could help. I figured I would take one last stab at it before asking the Nmap devs if someone could help.
Finally, after a few days of intense focus and substantial Googling, I was able to produce a working portable executable binary for Ncat version 7.91 statically linked against OpenSSL 1.1.1j. A few days later, I thought I might try to save someone else the struggle of working through the process as I had and so I also updated the Ncat portable compilation instructions on the Nmap project's wiki. If you're just looking for a quick walk-through of the process with no screenshots, you can visit the Nmap project's wiki and use the version of the instructions I updated there. Otherwise, if you're running into issues or if you find that something in those instructions is not entirely clear, the step-by-step guide below may be more helpful.
Compiling Ncat Portable for Windows
Step 0: The Prerequisites
Before you get started, there are a few things you will need:
- Microsoft Visual Studio
- OpenSSL Source Code
- Perl
- Netwide Assembler (NASM)
- Nmap Source Code
- Nmap Windows auxiliary files
These prerequisites include all of the tools and code you will need to build both OpenSSL statically from source as well as to build Ncat portable. It's worth noting that, in some cases, there may be multiple alternative distributions or versions of a tool available. For example, there are several Perl distributions available that one could feasibly use to satisfy the requirements of this process. In cases like this, the specific distributions or versions provided in this guide are simply known-working recommendations. The available alternatives may work in place of the recommended distributions or versions of a tool; however, the process for downloading, installing, and configuring these alternatives may differ greatly from what is explained in this guide. This is worth noting as you proceed through the sections below.
Microsoft Visual Studio
You will need to download and install Microsoft Visual Studio and add the appropriate workload for desktop development with C++. Any edition (i.e. Community, Professional, or Enterprise) will work, but you must install version 2019 or later. If you choose to install a later version of Microsoft Visual Studio Code than 2019, you will need to configure the installation for the workload to include the optional Microsoft Visual C++ (MSVC) version 142 compilers and libraries.
As of the time of this writing, the latest version of Microsoft Visual Studio is 2022. This is the version that I will be using in the steps that follow. The specific edition that I will be using is the Community edition, which can be obtained for free from the Microsoft website. In the steps that follow, I will cover the process for adding the "Desktop development with C++" workload to Visual Studio as well as the process for including the "MSVC v142 - VS 2019 C++ x86/x64 build tools (v14.29)," which is necessary to build the ncat project, in the workload installation. NOTE: If you have opted to use Microsoft Visual Studio 2019 instead of a later version, you will only need to add the "Desktop development with C++" workload as the v142 build tools needed for building Ncat are the default build tools installed with the "Desktop development with C++" workload for Visual Studio 2019.
- Navigate to https://visualstudio.microsoft.com/downloads/.
- Select the option to download the edition and version of your choosing.
- Once the download completes, run the installer.
- When the installer menu appears, under the "Workloads" tab select the "Desktop development with C++" workload from the "Desktop & Mobile" section of the list.
- Within the "Installation details" pane, from the drop-down list under "Desktop development with C++" > "Optional" select "MSVC v142 - VS 2019 C++ x64/x86 build tools (v14.29)."
- NOTE: This step is only required when using Microsoft Visual Studio versions later than 2019.
- After making all necessary selections, click the "Install" button to proceed with the installation.
 Installing Microsoft Visual Studio Community 2022 with Necessary Workload and Build Tools
OpenSSL Source Code
The easiest way to obtain the sources for the latest releases of OpenSSL is to visit https://www.openssl.org/source/ and download the source code tarball for the desired OpenSSL version from the release table. The very latest sources for each version can be cloned or downloaded from the relevant branch on the official GitHub mirror of the OpenSSL git repository at this link https://github.com/openssl/openssl. As of the time of this writing, the current stable version of OpenSSL is the 3.0 series and the current Long Term Support (LTS) version is the OpenSSL 1.1.1 series, which is supported until 11th September 2023. Ncat will build successfully against static builds of both OpenSSL 3.0 and OpenSSL 1.1.1, so you should choose whichever of the two makes the most sense for your particular use case. In this guide, I will be using OpenSSL 3.0.0.
 OpenSSL 3.0.0 Source Code Download
Perl
Perl is needed to build OpenSSL. Strawberry Perl is recommended and is available from http://strawberryperl.com/. The Text::Template module, which is not part of the core Perl modules, is required to build OpenSSL. The Test::More module, which is also not part of the core Perl modules, is an optional requirement for running unit tests. If you do not plan on running the tests on your OpenSSL build, this module is not needed. If you are using Strawberry Perl, you should be able to install any required modules from the command prompt using CPAN.
- Download and install Strawberry Perl from http://strawberryperl.com.
- Once the install completes, open a command prompt and execute the command below to install the required modules using CPAN.
cpan -i Text::Template
- (Optional) Execute the command below to install unit testing modules if you intend to perform unit tests.
cpan -i Text::MoreNetwide Assembler (NASM)
The Netwide Assembler (NASM) is also needed to build OpenSSL. It is the only supported assembler and is available from https://www.nasm.us. After installing NASM, ensure that you add it to your system's PATH.
- Download and install the latest stable version of NASM for Windows from https://www.nasm.us.
- Once the install completes, ensure that you proceed to add the directory where you installed NASM to your system's path.
- (Optional) Verify NASM is on PATH by running
nasm --versionfrom a command prompt.
Nmap Source Code
In order to build Ncat, you will first need to obtain the Nmap source code. The source code tarball for the latest stable release of Nmap can be downloaded from the "Source Code Distribution" section of the Nmap download page at https://nmap.org/download. NOTE: The file formats offered for download are Bzip2 compressed Tar archive (.tar.bz2) and Gzip compressed Tar archive (.tar.gz/ .tgz) so, if you have not already, you will need to install 7-Zip or a similar tool to uncompress and extract the files from the archive.
If you prefer to use the very latest code, it can be obtained from the Nmap Subversion (SVN) source code repository. Detailed instructions for obtaining the Nmap source code from the SVN repository are already available on the Nmap project’s wiki and thus will not be covered in this guide.
- Download the Nmap source code tarball from https://nmap.org/download.
- Once the download has completed, proceed to uncompress and extract the files from the archive to a convenient working directory before moving on to the next set of instructions.
Nmap Windows auxiliary files
Precompiled binaries of the dependencies for building Nmap on Windows are stored in the Nmap SVN repository. These precompiled binaries are stored in the nmap-mswin32-aux/ directory which is intended to be a sibling of the Nmap source code directory in the directory tree when compiling from source on Windows. The build files are configured to look for dependencies in this checked-out directory. Even though we will be replacing the contents of the nmap-mswin32-aux/OpenSSL directory with the files from our static build of OpenSSL, maintaining this directory structure is the easiest way to avoid needing to reconfigure the Visual Studio project files to point to an alternate directory. NOTE: It is important that the nmap-mswin32-aux/ directory and the Nmap source code directory share the same parent directory. Going forward, we will assume that your directory structure will match that shown below.
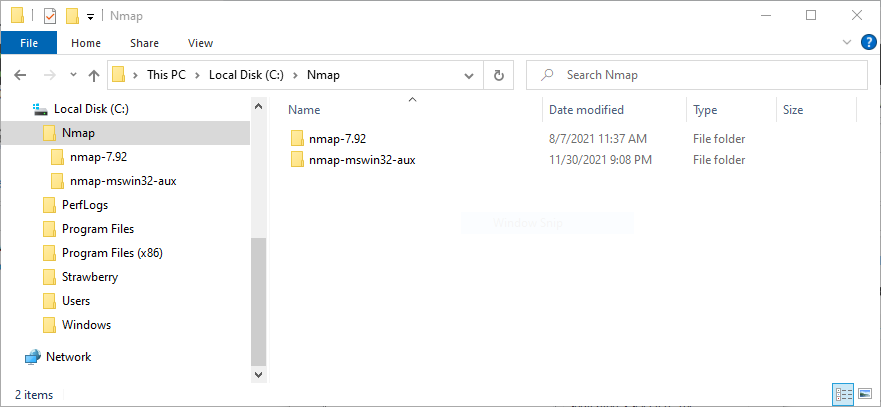 Directory Structure for Ncat Build
In order to check out the directory containing the auxiliary files from the Nmap SVN repository, we will need an SVN client. In the following steps we will install the TortoiseSVN client with the optional command line client tools. For the purposes of this guide, we will be using TortoiseSVN which is freely available for download from https://tortoisesvn.net/ and distributed under GPL, but any SVN client will work.
- Navigate to https://tortoisesvn.net/downloads.html and proceed to download the latest version.
- Run the installer, being sure to select to option to install the optional "command line client tools," which is disabled by default, as we will be using the command line client tools in the next set of instructions.

Now that we have our SVN client, we can proceed to check out the nmap-mswin32-aux/ directory from the Nmap SVN repository to the working directory for our build by running the command below from a command prompt. NOTE: Ensure that before you run the checkout command you change directory to the working directory for the build from command prompt.
- Open a command prompt and
cdto the working directory for the Ncat build. - Run the SVN checkout command below to check out the
nmap-mswin32-aux/to the current directory.
svn checkout https://svn.nmap.org/nmap-mswin32-aux
Step 1: Build OpenSSL Statically
By this point, you should have downloaded and installed everything that is required to build OpenSSL statically. Building OpenSSL is the last thing that needs to be done before we proceed to build our portable Ncat executable. The steps below will guide you through the process of building OpenSSL statically.
- If you are using a source code tarball of one of the OpenSSL releases downloaded from the OpenSSL project's website, begin by extracting the source code from the archive to a convenient working directory.
- If you have opted to clone the OpenSSL GitHub repository, the directory that you cloned it to will be your working directory for the build
- Create the directory
C:\OpenSSL. This will be the installation directory we will output to.
- NOTE: While you can use a different directory, you will need to modify the prefix specified when running the Perl command to configure the build to point to the appropriate directory.
- Prepare a command line environment to perform the build using one of the two methods below (for more information on building on the command line see this article):

vcvarsall.bat script by executing the command below. Note that the path to the vcvarsall.bat script depends on the version of Visual Studio installed. The command below contains the path to the script when using Visual Studio 2022. "C:\Program Files\Microsoft Visual Studio\2022\Community\VC\Auxiliary\Build\vcvarsall.bat" x86
- From the command line environment you have prepared, run the following commands to verify that both Perl and NASM are on your system's PATH.
- If both of the commands below return a valid response, proceed to the
next step. If either returns an error, add the offending tool(s) to your system's PATH before proceeding to the next steps.
- If both of the commands below return a valid response, proceed to the
nasm --version perl --version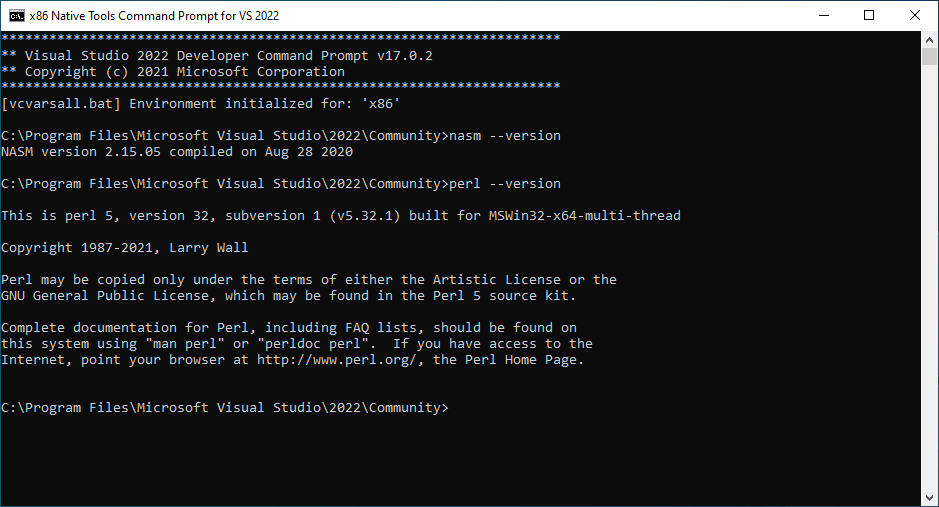
- Change directory to the directory where you extracted or cloned the OpenSSL source and execute the following commands:
perl Configure --prefix=C:\OpenSSL enable-weak-ssl-ciphers enable-ssl3 enable-ssl3-method VC-WIN32 no-shared perl -pi -e "s|/debug|/NXCOMPAT /DYNAMICBASE /SAFESEH| if /^LDFLAGS/" makefile nmake -f makefile install_dev
- Assuming the build completes without issue, you should be prepared to move on to build Ncat statically.
Step 2: Build Ncat Statically
- Begin by replacing the contents of the
\nmap-mswin32-aux\OpenSSLdirectory with the contents of theC:\OpenSSLdirectory from the static build of OpenSSL you just completed. - Within the directory containing your local copy of the OpenSSL source code, locate the
\mssubdirectory. Within the\msdirectory, locate and copy the file applink.c (i.e.C:\openssl-x.x.x\ms\applink.c) to the directory\nmap-mswin32-aux\OpenSSL\include\openssl
- Within the directory containing your local copy of the Nmap source code, open the Nmap solution (i.e. nmap.sln) from the \mswin32 subdirectory (e.g. C:\Nmap\nmap\mswin32\nmap.sln) in Visual Studio.
- NOTE: If the "Review Solution Actions" prompt appears after opening the solution in Visual Studio, be sure to choose the "No Upgrade" option from the drop-down next to "Platform Toolset" under "Retarget Projects." The "Windows SDK Version" setting defaults to targeting the the latest version of the Window SDK installed and for our purposes can be left as is.
- Change the "Active solution configuration" to Ncat Static and "Active solution platform" to Win32 by following the steps below:
- Right-click on Solution nmap in the "Solution Explorer" and select "Configuration Manager."
- Click the drop-down under "Active solution configuration" and select Ncat Static.
- NOTE: Ensure that the nsock, nbase, and ncat projects all show "Static" as the selected configuration.
- Click the drop-down under "Active solution platform" and select Win32.
- Important: Set the liblua project to build by checking the box in the "Build" column for that project. It is not set to build by default but is needed to build Ncat statically.
- Close the "Configuration Manager."
- Change the liblua project runtime library from linking "Multi-threaded DLL (/MD)" to linking "Multi-threaded (/MT)" by following the steps below:
- Right-click the liblua project in the "Solution Explorer" and select "Properties."
- Within the navigation pane of the liblua "Property Pages," navigate to "Configuration Properties" > "C/C++" > "Code Generation."
- Within the configuration pane of "Code Generation," click the dropdown next to "Runtime Library" and select "Multi-threaded (/MT)."
- Click "Apply" and then click "OK" to close the "Property Pages."
- Add the directory
..\libluato the "Additional Include Directories" andcrypt32.libto the "Additional Dependencies" of the ncat project by following the steps below:- Right-click the ncat project in the "Solution Explorer" and select "Properties."
- Within the navigation pane of the ncat "Property Pages," navigate to "Configuration Properties" > "C/C++" > "General."
- Within the configuration pane of "General," click the dropdown next to "Additional Include Directories" and select "<Edit...>."
- Within the "Additional Include Directories" editor, click the "New Line" icon or press ctrl + insert and add the directory path
..\liblua. - Click "OK" to exit the "Additional Include Directories" editor.
- Once again within the navigation pane of the ncat "Property Pages," navigate to "Configuration Properties" > "Linker" > "Input."
- Within the configuration pane of "Input," click the dropdown next to "Additional Dependencies" and select "<Edit...>."
- Within the "Additional Dependencies" editor, add a new line by hitting the enter key and enter
crypt32.lib - Click "OK" to exit the "Additional Dependencies" editor and then hit "Apply" and "OK" to exit the ncat "Property Pages."
- Right-click the ncat project in the "Solution Explorer" and select "Set as StartUp Project."
- Right-click the ncat project in the "Solution Explorer" and select "Build." Alternatively you can press the F7 key to start building.
- Once the build process completes, you can retrieve your compiled Ncat portable executable from the
\ncat\Release\directory within the directory containing your local copy of the Nmap source code (i.e.C:\Nmap\nmap-x.xx\ncat\Release\ncat.exe).
Wrapping Up
Assuming you didn't run into any issues, by now you should have successfully compiled your own portable Ncat executable. Even though I am confident in this process as I have documented it in the steps above, it's always recommended that you test the executable to make sure all functions are working as intended. In particular, I strongly encourage anyone who follows this process to use a packet sniffing tool such as Wireshark to capture a TCP session between a host running the portable Ncat executable and another host running Ncat from a full installation of Nmap established with the --ssl option. By analyzing one of the TCP streams from the connection, you should be able quickly verify that the transaction is encrypted as the data should be in encrypted text (ciphertext) rather than in plaintext. Take a look at the examples below for further clarification.
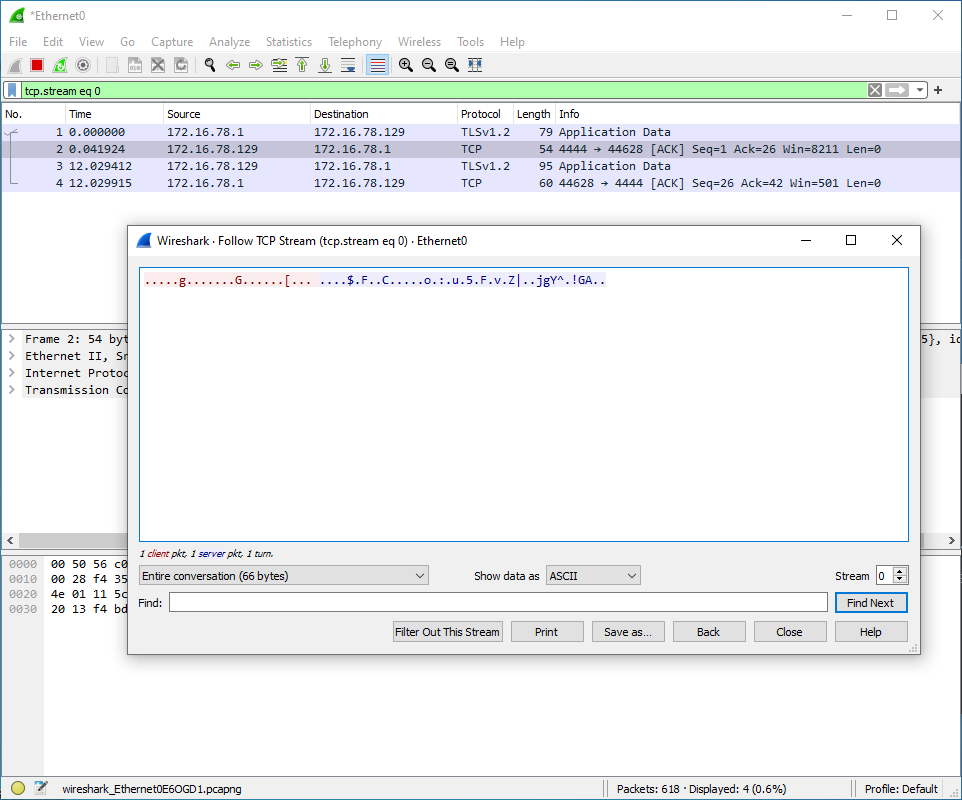
--ssl Option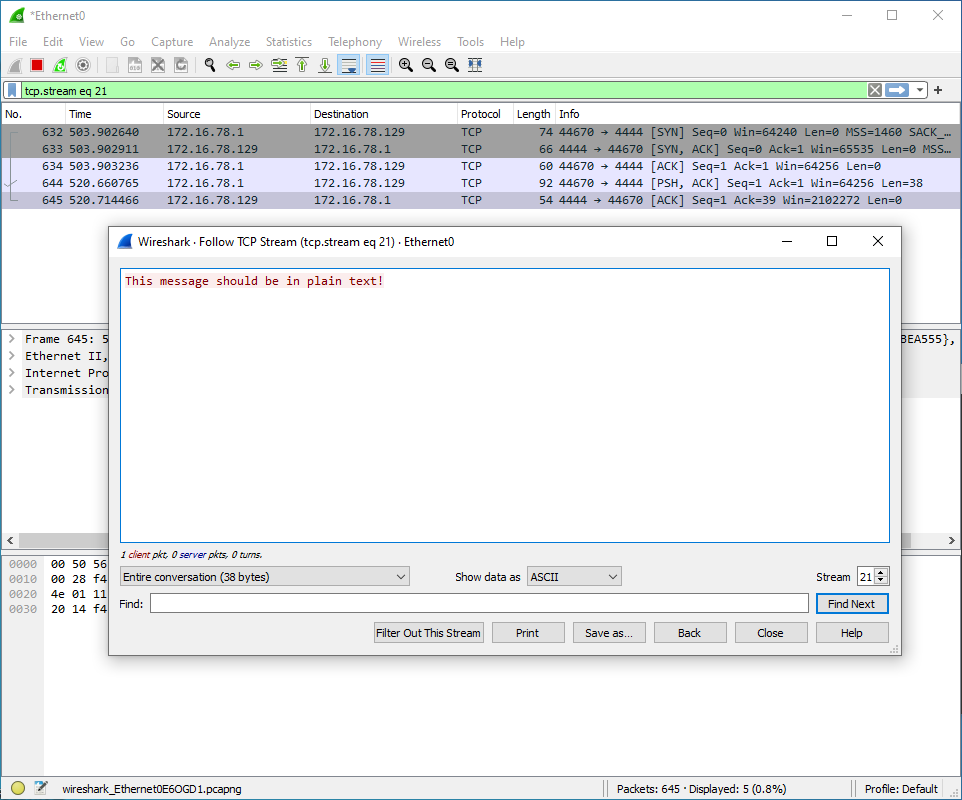
--ssl OptionIf you've made it this far, I hope that you found this guide to be helpful. If you run into any issues that you cannot resolve or if you have any feedback, please feel free to reach out to me through my Contact page. Otherwise, I will do my best to keep this guide up-to-date as things change and newer versions of either Nmap or OpenSSL are released.